
EdITS Assessment Platform Support
Welcome
The EdITS Assessment Platform (EAP) is a user management and assessment delivery platform for institutions, schools, and career counselors. The EAP enables you to administer assessments, manage examinees, and track results for all your EdITS products. You can create groups of products and examinees (students or clients) and assign administrators to these groups. You can also customize an administrator’s permission level for each group to give different levels of access depending on the needs of your organization.
See the topics below to find support for all the latest features of the EAP:
Signing In to the System
To get started you will need to sign into the EAP. Go to https://eap.edits.net, enter your username and password, and click “SIGN IN.” You will then be directed to your dashboard.
If you do not have a sign in, please see our steps for becoming an administrator.

Recovering Your Password
If you forget your password, you can click the “Forgot password?” link on the sign in page. Enter your email address and click “SEND RECOVERY EMAIL.” A password reset link will be sent to your email address. Click on the link in your email and enter a new password. After you enter a new password, you will be taken to your dashboard.
If you forget your username, please reset your password using the above method. Once you are signed in, your username is displayed in the upper right corner of the screen.
Updating Your Sign-In
If you wish to change your username, password, email, or other demographic information, first sign in to the system. Click on your username in the upper right-hand corner of the screen. You will be taken to a screen that allows you to edit your information. To save your changes, you must enter your current password and click the “UPDATE” button.
Dashboard Overview
When you sign in to your dashboard, you will see a list of your administrator groups. You will also see tabs called All Examinees, Your Purchases, and Your Products & Samples. All Examinees contains an aggregated list of each examinee across all of your groups. Your Purchases contains the products that you have refilled in the past (see Purchasing Products). Your Products & Samples contains the assessments that have been assigned to you personally.
Each group has a name, description, available products, permission, and action icons. You can view a group’s name and description, product count, examinee results, examinees, and administrators by clicking on the icons in the actions column or by clicking on the Name of the group. Below is the legend for all our icons:

NOTE: If you see a message saying, "There are no products in your dashboard. Please enter a passcode to join a group. Please contact your administrator for a passcode," you have not joined any groups and you are not an administrator. You will need to either contact customer service or get an administrator invitation from another administrator.
Becoming an Administrator
Being an administrator means that you either placed an order with our customer service department, or you were given administrator access from another administrator of the group.
Accepting an Administrator Invitation
Administrator invitations are emailed to you from support@edits.net. If you are new to the system, click on the button that says “CREATE NEW ACCOUNT”. Complete the registration form to create your sign-in. After you sign up, you should see the groups in your dashboard.
If you have already signed up on the EAP as an examinee or administrator, click on the button that says “SIGN IN TO EXISTING ACCOUNT”. This will allow you to use your existing sign-in credentials.
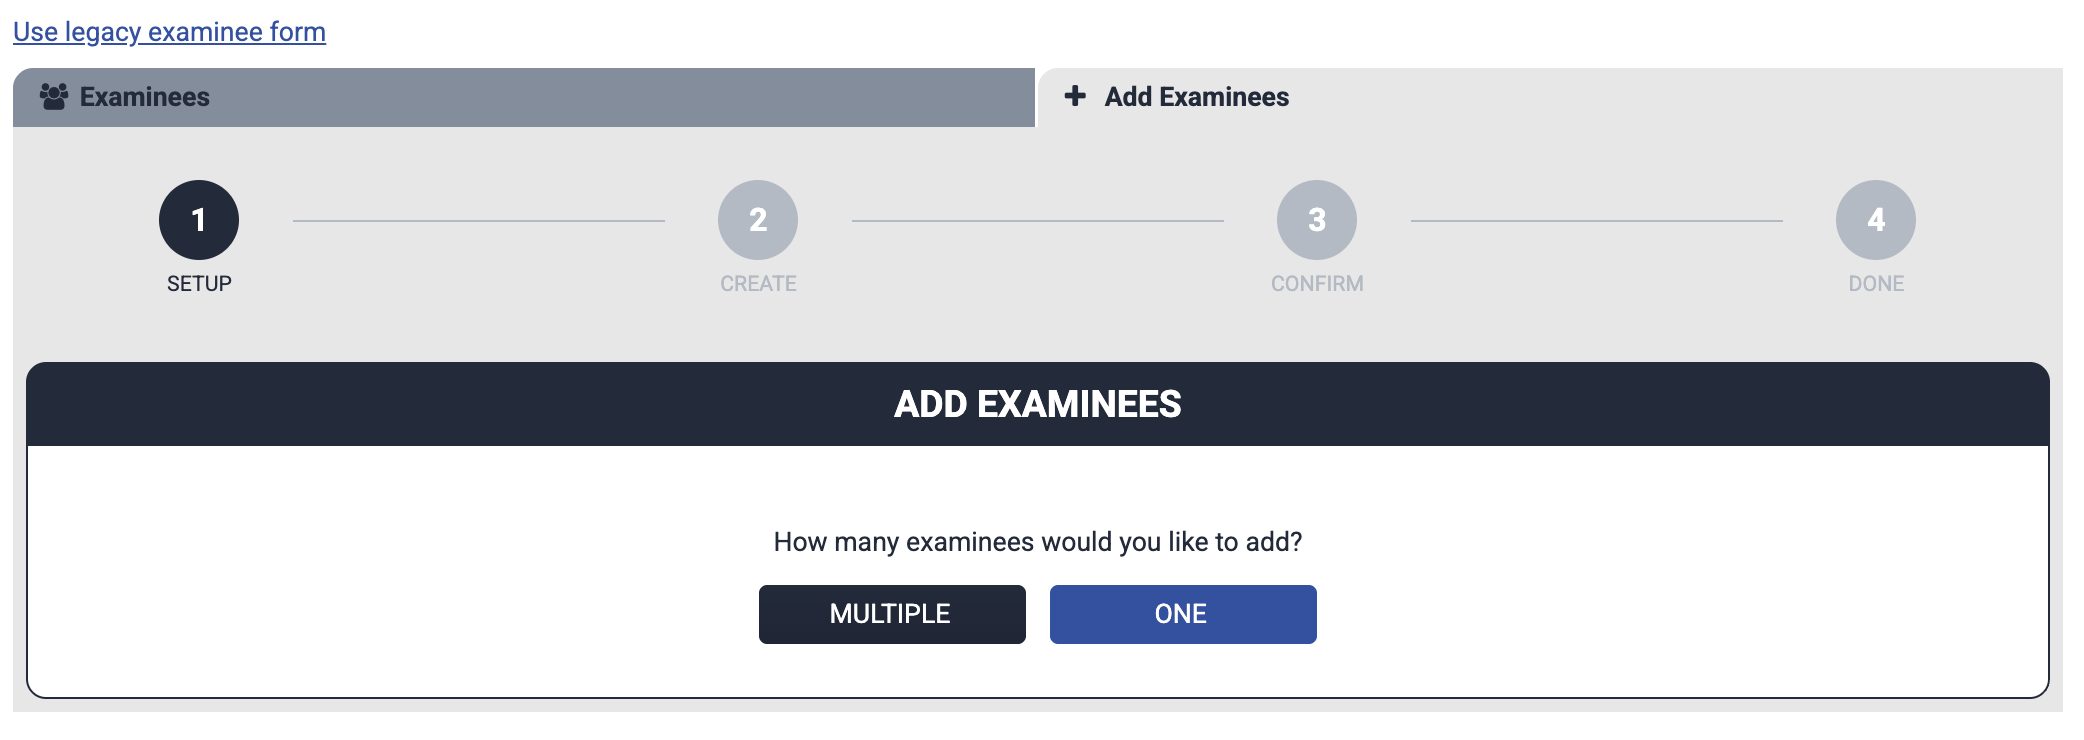
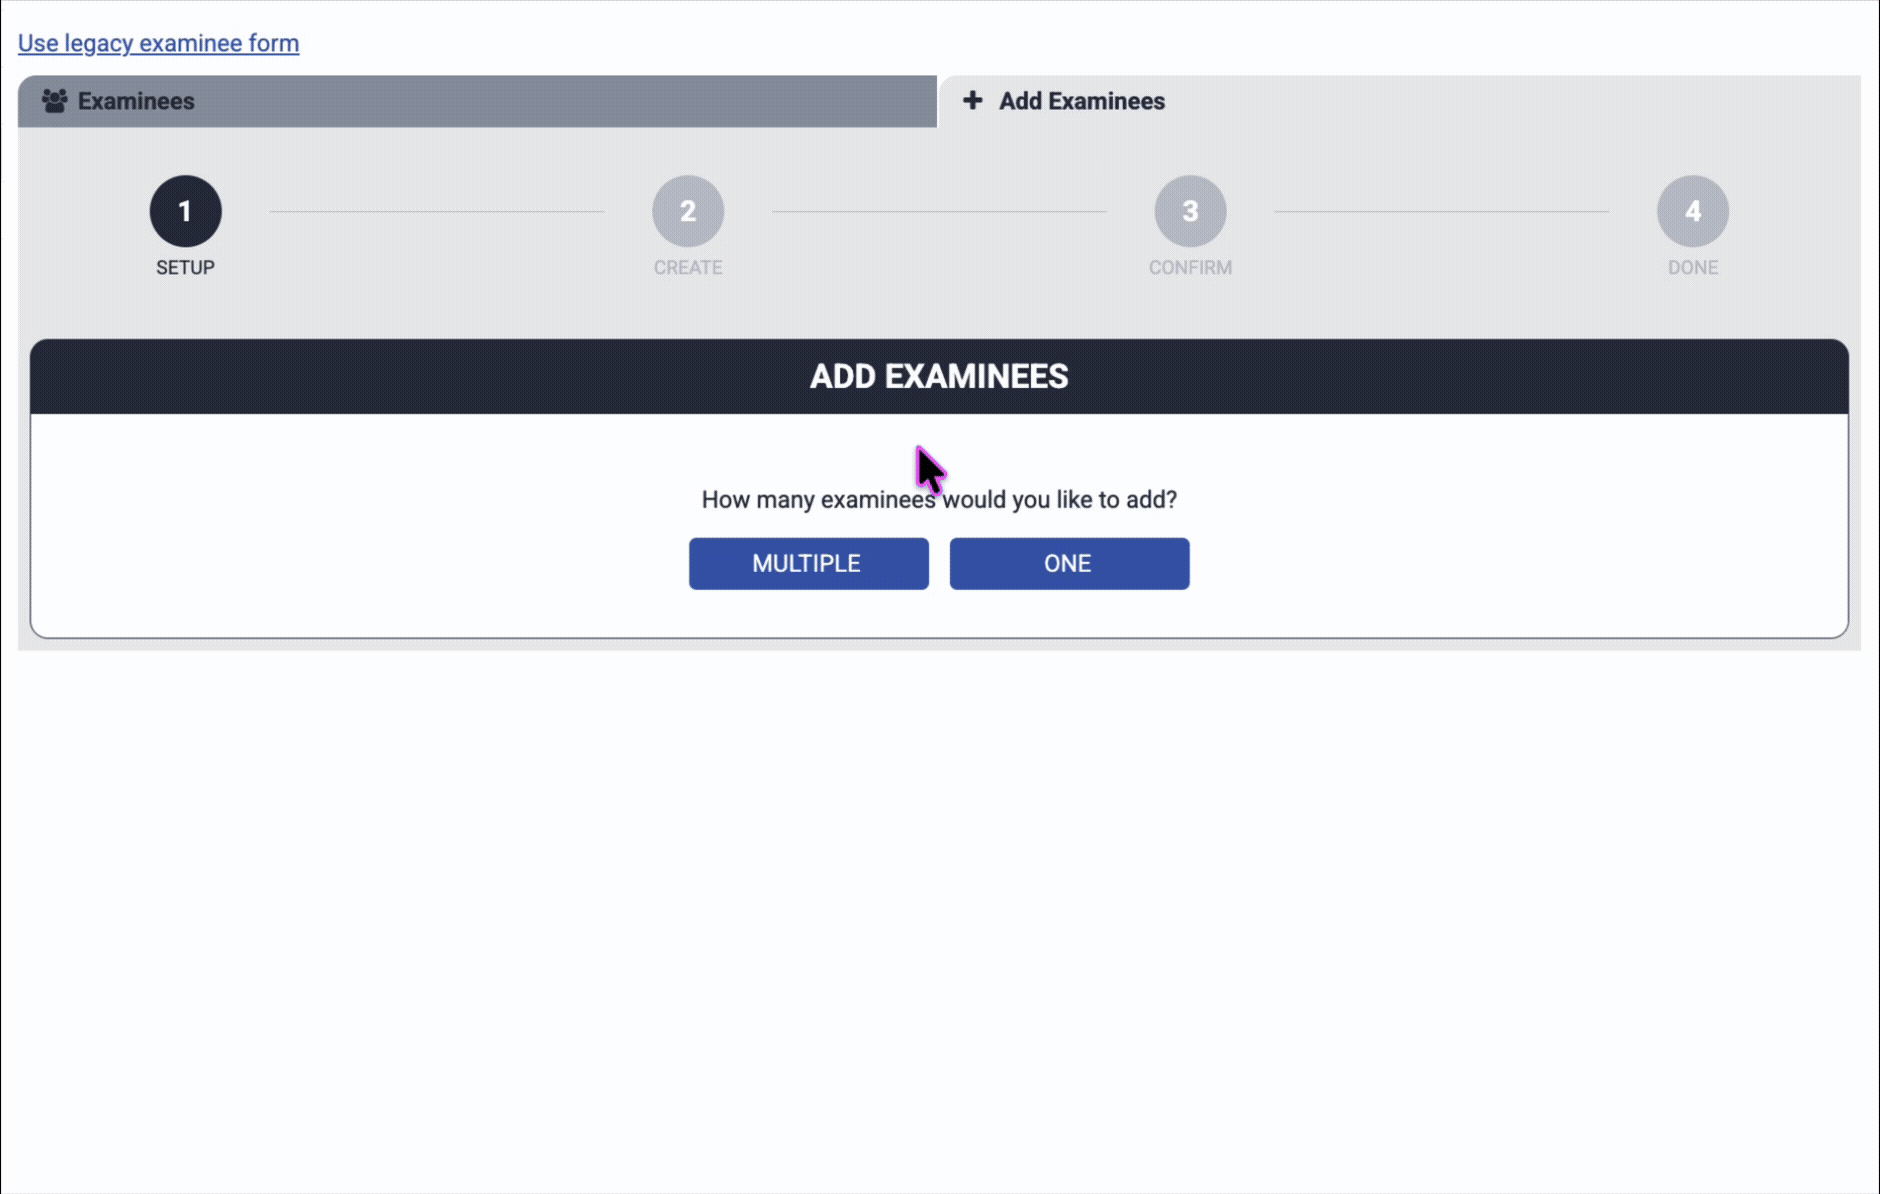
Adding Examinees
To register an examinee, navigate to the Examinees page from your dashboard by clicking the Examinee symbol in the Actions column for your group. You can also reach the page by clicking your group’s name, and then clicking “Examinees” from the menu on the left. This page will show you a list of all the examinees in your group.
Click the “Add Examinees” tab to begin the process.
Click “ONE” to add a single examinee. Click “MULTIPLE” to add multiple examinees at once.
Adding One Examinee
If you wish to manually create a user’s credentials and/or you are testing remotely, this is the best way to add examinees.
Choose the product to assign from the dropdown menu and click “Next” to proceed.
NOTE: Ensure you have at least one product available to assign.
Fill out the fields marked with (*). If your examinee has one, we recommend using their email address for the USERNAME and EMAIL fields.
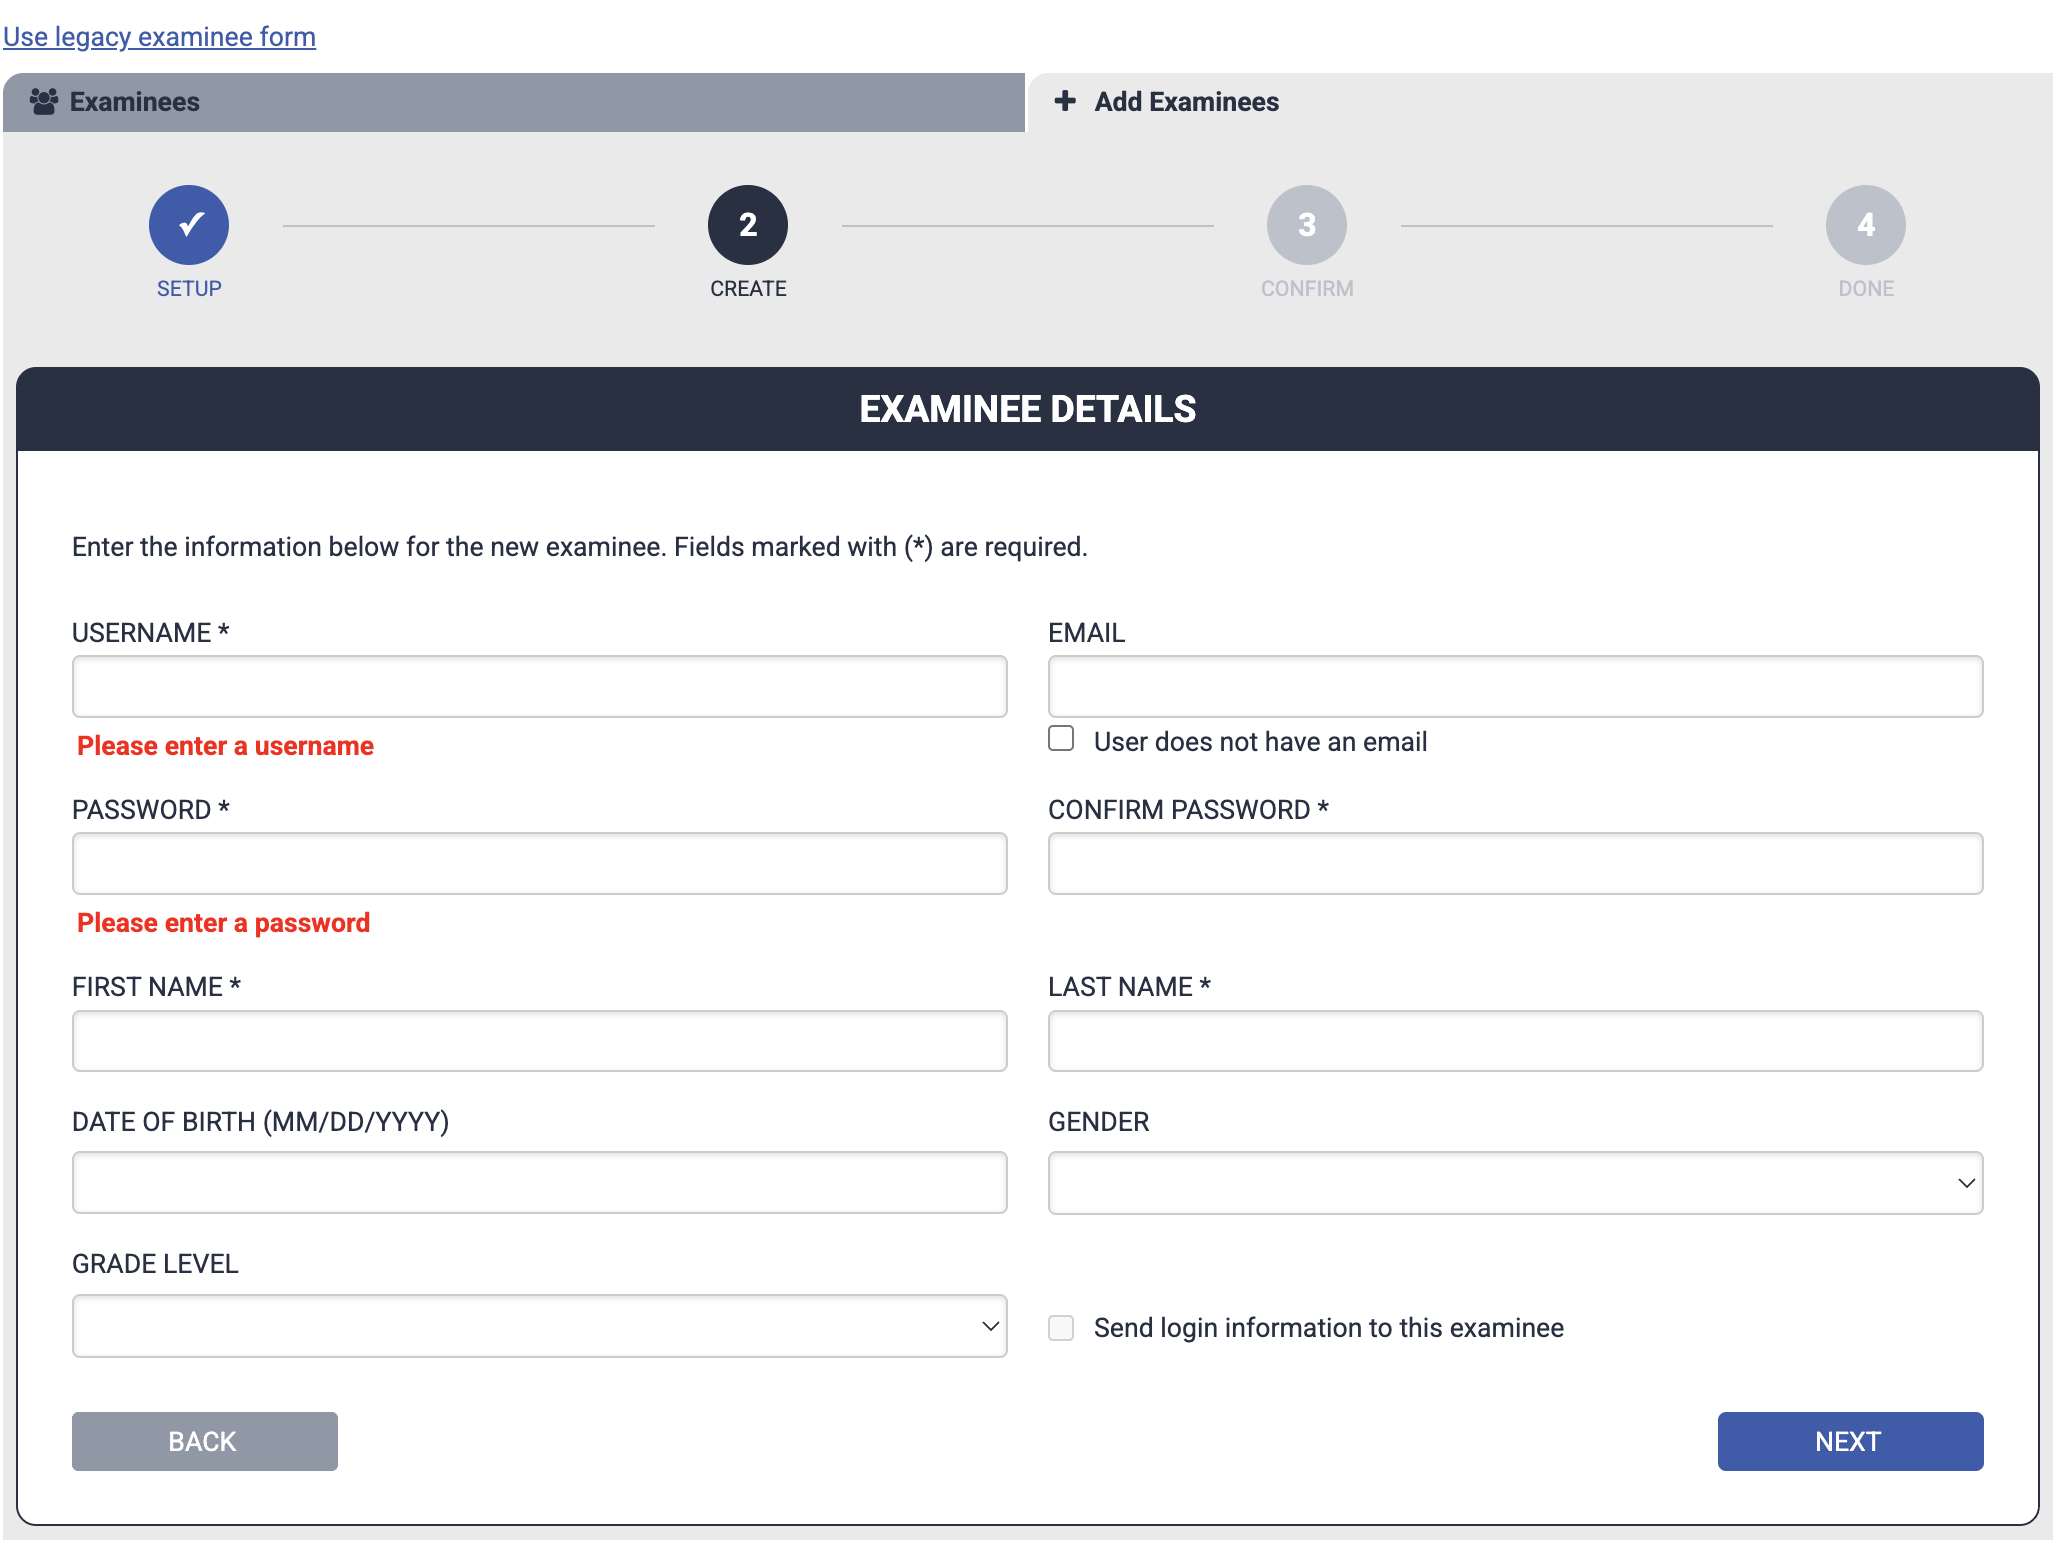
If you wish to send the examinee an automated email with this information, click the box next to “Send login information to this examinee.” Click “Next” to proceed.
Review the information on screen and then click “Confirm” to create the account.
If you checked the box to send an email, the user will receive an automated message from support@edits.net containing their username and a temporary password.
After logging in for the first time, the user will be asked to enter a new password. For security purposes, we recommend using a different password than the temporary one in their invite.
Adding Multiple Examinees
If you are using the EAP in a classroom or group setting using a passcode is the best way to add your examinees.
Choose the product from the dropdown menu and click “Next.”
NOTE: Ensure you have enough products in your group.
Distribute the instructions that appear on screen to your examinees.
The instructions include your group’s passcode, which is “live” and will not change unless you manually refresh it (see Generating New Passcodes). In other words, anyone with access will be able to create an account and assign themselves an assessment. Please distribute it carefully.
Click “DOWNLOAD INSTRUCTIONS PDF” at the bottom of the page if you would like a formatted document with the instructions to email or print.
Click “Done” to return to your Examinees page.
Using a Passcode
Each type of product in your group is associated with a unique passcode on your Products page. To find your passcode(s), you can click on the Products icon in the Actions column, or you can click on the name of your group and then click Products from the menu on the left. These passcodes can be used to add examinees to your group. Direct your examinees to https://eap.edits.net/signup to create a sign-in. Once they have created their account, they will be prompted to enter a passcode.

Bulk Upload
If you are testing a large group and wish to add them ahead of time, our support team can import a spreadsheet of examinees for you. Contact us for pricing and availability.
Legacy Method
Prefer the previous method for adding examinees? Click “Use legacy examinee form” to revert back to our legacy version.
-
The easiest way to register examinees into the EAP is to send them an email invitation. This is the best method if your examinees have email addresses and you want them to take the assessments anywhere.
To send an email invitation, click on the examinee symbol in the actions column in the group you want to invite them. This will show you a list of all the examinees in the group. Click on the tab that says "Invite Examinees". Enter the email address or addresses separated by a comma if you want to invite multiple examinees. Select the product you want the examinee to complete, then click send invite. The invitation will appear in the pending invitation list below.
If the examinee does not receive the email, you can click on the email symbol to resend the invitation.
If you entered an incorrect email address, or the examinee never accepts the invite, click the X icon to revoke the invite. This will credit the product back to your group.
If you are out of products, you will not be able to send an invitation.
-
If your examinee does not have an email address, or you want to create their sign-in information, you can directly create an examinee in your group.
First click on the Examinee icon in the groups list. Then click on the tab that says, "Add Examinees". Fill out the information for your examinee and select the product you want to assign to them. Click the button "Add Examinee" to complete the process. Your examinee must sign-in under their username and password to take the test.
If you add examinees using this method, do not send them an invitation from the EAP. You will need to email them separate instructions.
If your examinee does not have an email address, or does not want to provide one, check the box that says, "User does not have an email address". This will remove the field. However, both the administrator and the examinee will not be able to reset the password without an email address, in which case you must contact our customer service team.
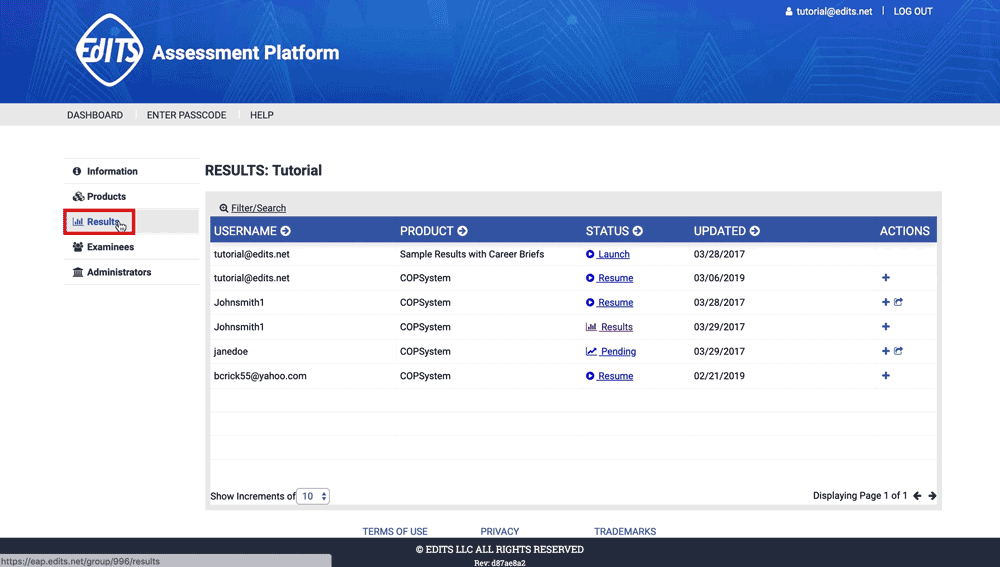
Viewing Examinee's Results
There are three ways to view examinee results. You can view all results in your group by clicking on Results from the left-hand menu, or you can click on the Results icon in your dashboard. Alternatively, you can click on the results icon from your group’s examinees list. See Advanced Examinee Management for more information.

Or

Results have five states: New, Launch, Resume, Pending, and Results.
New – indicates that the examinee has not started the product.
Resume – indicates the product is started but not finished.
Launch – indicates product has been viewed/used.
Pending – indicates the product has been finished and scored but the administrator has not released the results.
Results – indicates that the product is finished and available for viewing.
In order to view the results of an inventory, the examinee must complete all the assessments. You cannot view results in the "Resume" state, but clicking “Resume” will display the tests that an examinee has not yet completed.
Releasing Results
If you prefer, you can purchase all products with "suppressed results". This option allows you to control the release of the results to your examinees.
When an examinee completes all their assigned assessments, the status will become “Pending”. The examinee will not be able to see their results, but the administrator will be able to view the results by clicking on the link that says “Pending”.
To give your examinee access to their results, click on the Release Results icon. This will open a confirmation window. As soon as you click yes, your examinee can access the results, even if the link says “Pending”.
Entering the MSD Scores
The Manual Speed and Dexterity (MSD) is the last test of the Career Ability Placement Survey (CAPS). Your examinees can either self-estimate their responses or print out and take the test. If you are scoring the MSD for your examinee, you can enter their results by clicking on the “Enter MSD” link which is represented by a plus icon in the Actions column. This will open a window where you will enter the score and adjust the gender and grade level for the examinee. The gender and grade level determine the norm group that will be used for scoring.

You can enter the MSD scores at any time. This will cause the test to be rescored with the new values if it is finished.
Advanced Examinee Management
There are several advanced examinee features available. You can reset an examinee’s password, move examinees between groups, and assign additional products.
All these actions are performed from the main Examinees page. You can navigate to this page from your dashboard by clicking on the Examinees icon, or you can click “Examinees” from the menu on the left from any group screen.
Resetting a Password
If your examinee forgets their password, and they have an email address in the system, you can reset the password. Click on Reset Password and a temporary password will be sent to the examinee’s email address.

Moving Examinees
If you have created multiple groups, you can move examinees between them. Navigate to the examinees list and click the Move icon in the Actions column of the examinee you want to move. Pick the destination group from the dropdown and click the Transfer button at the bottom of the pop-up. This will move the examinee along with all their assigned products to the new group.

Assigning Additional Products
You can assign additional tests to an examinee by clicking on the Assign icon in the Examinees page. This will open a pop-up with a drop down of all the available products in your group. Select the product from the dropdown and click “ASSIGN”. This will give the examinee an additional product.
Available Product Management
All products on the EdITS Assessment Platform have two states: assigned and available. Assigned products are products that an examinee has in their dashboard. Available products are the products you can assign to an examinee.
To view the available products you have in your group, click on the Products icon in your dashboard. This will open the product page, which shows a list of products in a group, the amount available to assign, the passcode associated with the product, and actions you can perform on this product.
Transferring Products
If you have multiple groups, you can transfer products between two groups by clicking the Transfer icon. Enter the amount and then select the destination group from the drop down menu. Click “TRANSFER” to move the products.
Generating New Passcodes
Administrators with full permissions are able to generate new passcodes from the Products page by clicking on the Generate New Passcode icon in the Actions tab. Passcode updates are irreversible. If a passcode is changed, please be sure to update any external documentation containing the old passcode.
Purchasing Products
You can “refill” your existing products directly from the EAP. From your Products page, click on the $ icon in a test’s Actions column. Enter the quantity you wish to add, enter your payment information, and click “NEXT”. Follow the steps, and then click “CONFIRM” to place your order. Once your order is placed, the products will be added to your group.
Please contact our sales team if you wish to refill products with a time accommodation, or if you wish to purchase 100+ products at once.
Exchanging Products
Examinees can only view their results if they have completed all the assessments within the product. If you want to give one test within a system of products, for example just the COPES portion of the COPSystem, you must contact our customer service team before your examinee begins testing. We cannot exchange products that have been started.
We also have time-and-a-half, or double time accommodations available for any timed test. However, you must contact our customer service team prior to testing, to exchange your product for this option.
Recovering Incomplete Tests
If an examinee does not start a test, EdITS can return these products to you as long as they have not been used. However, if the examinee has started a test, we are not able to return it to your available products.
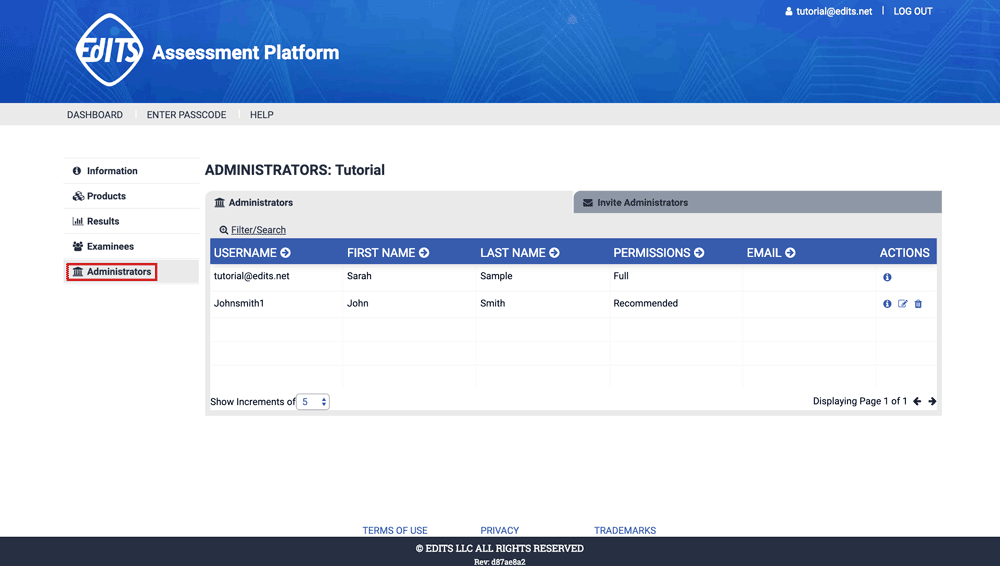
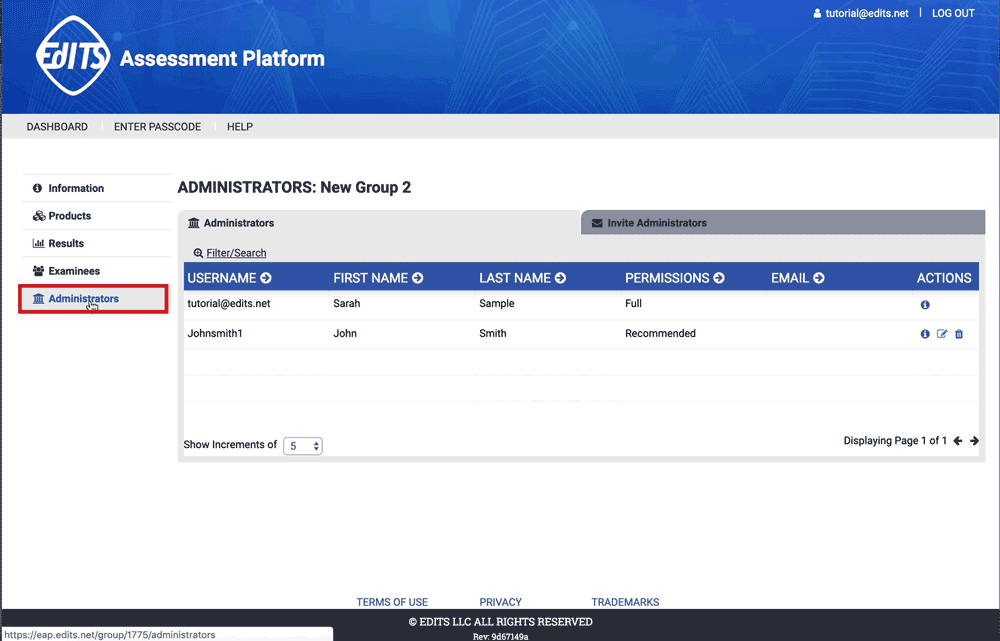
Administrator Management
Each group has at least one administrator but may have more depending on the needs of the organization. To view the administrators in a group click on the Administrator icon from your dashboard. This will open the Administrator screen. Here you will see a list of all the administrators in your group and their permission levels. You can edit their permission levels by clicking on the Edit icon. You can remove an administrator by clicking on the Delete icon. For a complete description of the permission levels available to the administrators, see the Administrator Permissions section.
You can invite additional administrators to your group by clicking on the Invite Administrators button. Enter the email addresses of the administrators you want to invite, select the permissions you want the new administrator to have in this group, and click send. An email invitation will be sent to the administrator.
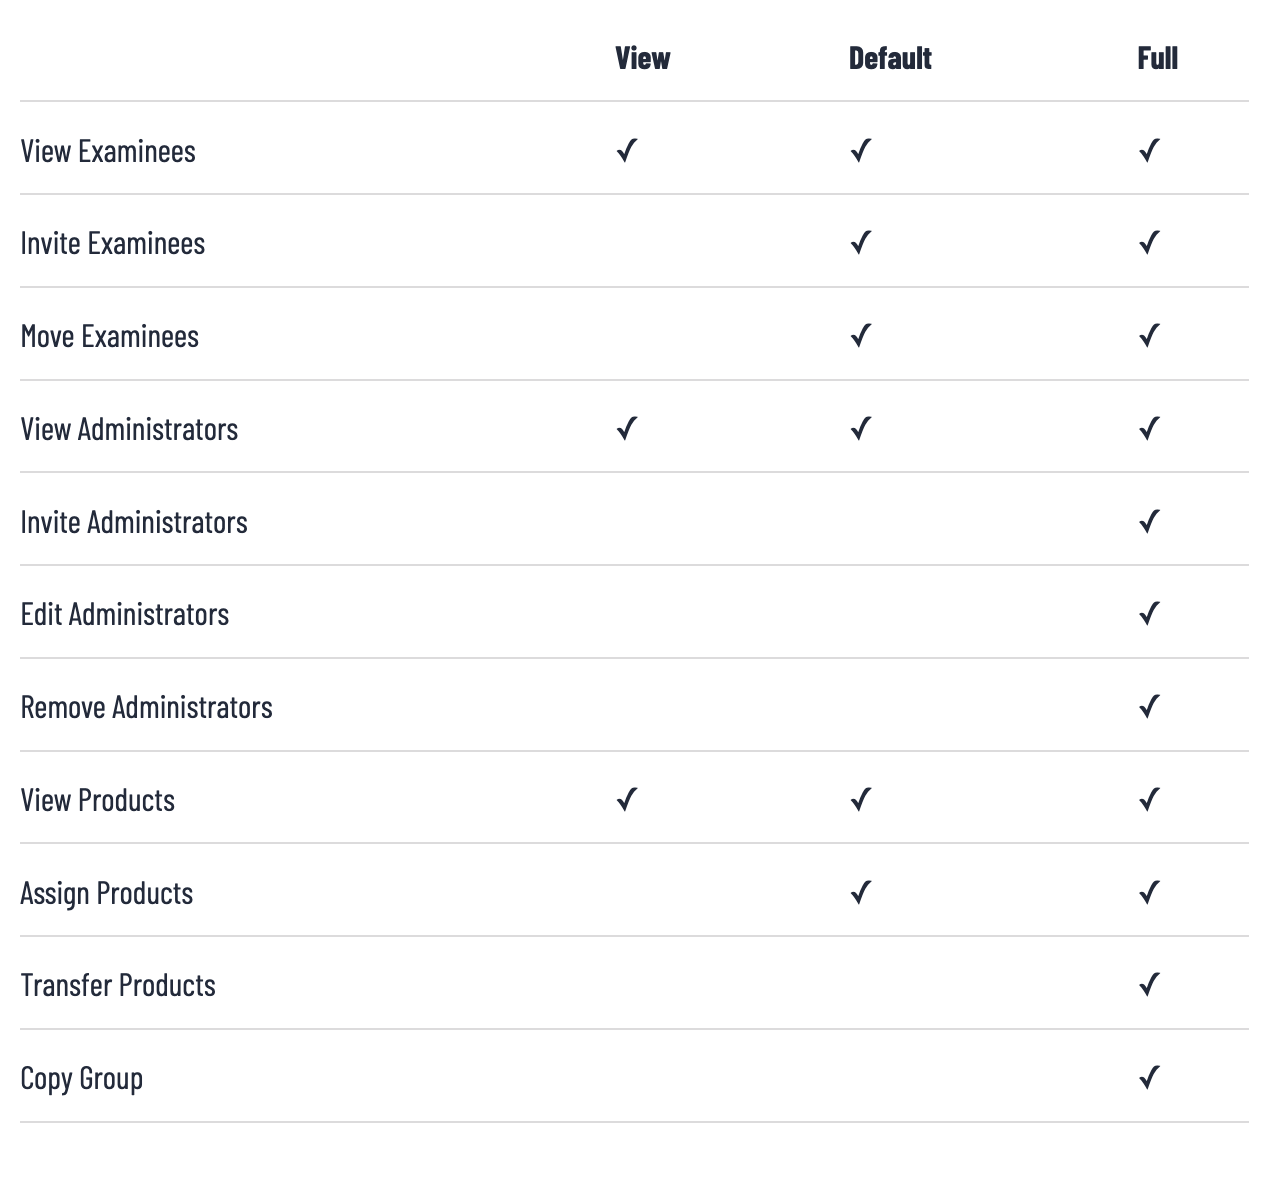
Administrator Permissions
Each administrator can have a custom permission level. These permission levels are listed below with a description of each permission level.
Examinees
View Examinees gives you the ability to view the first and last name, email address, and username of examinees in your administrator group. Additionally, it allows you to view the assigned products and assessment results of examinees in the group. You can also send a password reset link to an examinee’s email address.
Invite Examinees allows you to send, view, and revoke examinee invitations associated with this group. This permission level requires that you have the View Examinees permission level.
Move Examinees allows you to transfer examinees from one group to another. You must have the Move Examinees permission in BOTH groups to have the ability to move examinees. The Move Examinees permission level requires that you have View Examinees permissions.
Administrators
View Administrators gives you the ability to view the first and last name, username, and email address of your fellow administrators in this group. You can also view their permission level.
Invite Administrators gives you the ability to send administrator invitations for this group. For each invitation you can customize the new administrator’s permissions. This permission level requires that you have the View Administrators permission.
Remove Administrators allows you to remove existing administrators from the group. You may not remove yourself from the group.
Edit Administrators allows you to edit the permissions of existing administrators. You will not be able to edit any sign-in credentials for the administrator.

Products
View Products allows you to view the available products in the group.
Assign Products allows you to assign available products to an examinee. You must have permission to both view examinees and view products.
Transfer Products allows you to transfer products from one group to another. You must have the Transfer Products permission enabled in both groups.
Groups
Add a New Group is a link at the bottom of the Dashboard’s Groups page that allows an administrator to create a new group. You can use this feature to organize your administrators, examinees, and products. For example, if you have many different sites, schools or administrators, it may be helpful for each to have their own group.
When a new group is created, you are prompted to create a unique name for your new group, give it a description, and then select a group to copy your administrators from. Only administrators are copied into the new group. None of the products or examinees are transferred from the source. You must manually transfer the products and/or examinees that you want inside the new group.

Additionally, this can be used to help you manage your testing sessions. For example, you may want to copy a group at the end of each semester. This will bring over the administrators from last semester but not the products or examinees. Alternatively, you may want to expand the number of groups as your program or business grows. The Add New Group feature allows you to preserve your administrators and give you a clean examinee and product slate.
Permission Level Presets
For your convenience, the individual permissions are grouped into four categories: Recommended, Full, View, and Custom. The Custom category allows you to specify any combination of permissions you desire. You can view the permissions in each category in the following table: